

前回の記事でnginxの設定とphpの導入までが完了しました。
-

-
CentOS 7のNginx環境にPHP7をインストールして最短で開発環境を構築
こんにちは、ITエンジニアの小村(@system_kom)です。 Nginxに関する前回の記事ではウェブサーバーであるnginxのインストールと、バーチャルホストのセットアップまでを紹介しました。 今回はセットアップしたnginx環境でph ...
本記事では、ウェブサーバー(nginx)のHTTP通信を暗号化してセキュアな通信を行うための機能であるHTTPS通信をnginxで利用するまでの手順を紹介します。
HTTPSはウェブの通信で利用されているHTTP通信をSSLという機能を利用して暗号化を行っているものになります。現在、GoogleのchromeだとHTTPSに対応していないウェブサイトには警告が出力される他、SEOにも影響があるようです。
出来ればウェブサーバーの導入時には、HTTPS機能も有効にして、上記のような制限に引っ掛からないように設定したほうが良いので、早い段階での設定をオススメします。
サーバー証明書は今まで、有償のものを利用することが一般的でしたが、最近ではSSL通信の普及を行うLet's Encryptというプロジェクト(2016年4月スタート)で無料で発行しているものを利用することもできます。
因みにLet's Encryptはシスコ(Cisco Systems)、Akamai、電子フロンティア財団(Electronic Frontier Foundation)、モジラ財団(Mozilla Foundation)などの大手企業・団体がスポンサーとして支援していますので、信頼できるものです。
本記事ではLet's Encryptを利用してのHTTPS設定を行っていきます。
Let's EncryptでHTTPS化する環境は記事
-

-
CentOS 7へNginxをインストールして最短でサイトが表示できる手順
今までApacheに関する設定や機能の拡張について紹介してきましたが、ここ最近導入されている環境が増えている、もう一つのウェブサーバーNginx(エンジンエックス)をご存知でしょうか。 Nginxはパフォーマンスに特化されたオープンソースの ...
で紹介していますが、基本的な環境は以下の通りです。
- OSのバージョンはCentOSで最新のバージョン7.5を利用しています。(2016年6月現在)
- ウェブサーバーとしてnginx1.15.0がインストールされています。(2018年6月現在、mainline最新版)
- nginxは基本的な設定が完了して、バーチャルホストが二つ設定されています。
- バーチャルホストは”www.testdom.com”と”www.testdom2.com”になります。
- phpとphp-fpmの7.2系がインストールされて、テスト用のphpinfoが表示されています。
- サーバーはインターネットへ接続されており、グローバルIPアドレスが一つ、割り当てられています。
- ファイアウォールとしてfirewalldを設定しています。
この環境を前提に各バーチャルホストでHTTPSの設定を進めていきます。
※項目8-1. でも紹介していますが、2018年6月現在、epelレポジトリに含まれるcertbotのバージョン0.24は更新の確認でエラーが発生する可能性があります。回避方法については、項目8-1. をご覧下さい。
追記:2018年7月現在のcertbotパッケージ、バージョン0.25.1-1.el7では不具合が解決しています。
1. ホスト名の正引き確認
Let's Encryptを利用するためにはホスト名(FQDN:ホスト名にドメイン名がついたもの、以下ホスト名と記載がある時はFQDN)が正引き(ホスト名からIPアドレスを参照)できる必要があります。本記事では、ホスト名として以前の記事で設定されている”www.testdom.com”と”www.testdom2.com”を利用する前提としています。こちらはAレコードとしてDNSにIPアドレスを登録していますので、ホスト名の正引きができる状態になっています。(逆引きは不要です。)
設定を行う前に、ホスト名の正引きができることを確認します。Linux/Windowsの何れでも確認ができますので、ご自分の環境に合わせて行って下さい。※ホスト名の正引き設定は、ご利用のDNSサーバーによって異なるため、本記事では割愛しています。
1-1. hostコマンドによる正引きの確認(Linux)
Linuxではhostコマンドによるホスト名の確認が可能です。使い方はhostコマンドにホスト名を付けて実行します。
以下が実行例になります。尚、hostコマンドはデフォルトでインストールされていないため、yumコマンドでbind-utilsをインストールします。
# yum -y install bind-utils
bind-utilsがインストールされると、hostコマンドが利用できるようになります。”www.testdom.com”を確認する場合、以下のようにコマンドを実行します。
$ host www.testdom.com
www.testdom.com has address 111.8.21.167
合わせて、もう一つのバーチャルホストである”www.testdom2.com”も確認します。
$ host www.testdom2.com
www.testdom.com has address 111.8.21.167
こちらも正常に応答がありました。
指定したホスト名に対して、IPアドレスが表示されれば、DNSの設定は完了しています。
もしホスト名が見つからないという警告が表示された場合には、ご利用のDNS設定を見直して下さい。ここでは正常に確認ができたという前提で先へ進めていきます。
1-2. nslookupコマンドによる正引きの確認(Windows)
ホスト名の正引きはWindowsでも確認が出来ます。ウェブサーバーへbind-utilsをインストールしたくない場合などは、ご利用のWindowsから確認してください。Windowsの場合は、コマンドプロンプトを開いて、以下のように実行します。
>nslookup www.testdom.com
サーバー: UnKnown
Address: ***.***.***.** <=ご利用のDNSサーバー 権限のない回答: 名前: www.testdom.com Address: 111.8.21.167
合わせて、もう一つのバーチャルホストである”www.testdom2.com”も確認します。
>nslookup www.testdom2.com
サーバー: UnKnown
Address: ***.***.***.** <=ご利用のDNSサーバー
権限のない回答:
名前: www.testdom2.com
Address: 111.8.21.167
上記のようにIPアドレスの回答があれば、正引きの確認は完了です。
2.ファイアウォールへの接続許可設定
HTTPS通信ではHTTPで利用している接続ポート80番とは異なる接続ポートである443番を利用します。以前の記事ではHTTPS用の接続ポートはオープンしていないため、事前に接続ポートをオープンする設定を行います。
尚、ファイアウォールはCentOSのデフォルトであるfirewall-cmdを利用している前提となります。
2-1. 現状のファイアウォール設定を確認
先ず、現状の設定を確認していきます。HTTPS接続は、全てのユーザーに開放するため、インターフェイスに適用されているゾーン、”public”ゾーンの設定を確認します。
# firewall-cmd --list-all
public (active)
target: default
icmp-block-inversion: no
interfaces: ens33
sources:
services: dhcpv6-client http
ports:
protocols:
masquerade: no
forward-ports:
source-ports:
icmp-blocks:
rich rules:
上記のようにHTTPは許可されていますが、HTTPSは許可されていません。
2-2. HTTPSサービスの接続許可を追加
項目2-1. で確認した”public”ゾーンの接続許可サービスにHTTPSを追加します。追加は以下のように行います。
# firewall-cmd --add-service=https --permanent
success
”success”と表示されれば設定は完了です。設定を反映するためにファイアウォールの設定を読み込みます。
# firewall-cmd --reload
success
”success”と表示されれば設定の読み込みは完了です。
2-3. HTTPSサービスの追加確認
設定した内容が正常に反映されているかを確認します。確認は以下のように行います。
# firewall-cmd --list-all
public (active)
target: default
icmp-block-inversion: no
interfaces: ens33
sources:
services: dhcpv6-client http https
ports:
protocols:
masquerade: no
forward-ports:
source-ports:
icmp-blocks:
rich rules:
”services”の項目にhttpsが追加されていることが確認できれば、確認は完了です。
ここまででファイアウォールの接続許可は完了しました。
4. Let's Encrypt を利用したサーバー証明書の取得
引き続き、SSL証明書に関する設定を行います。HTTP通信をHTTPSへ変更するためには、サーバー証明書(サーバーの身分証明書)が必要になります。本章ではLet's Encryptを利用してサーバー証明書を発行する手順を紹介していきます。
4-1. certbotパッケージ導入前の設定
Let's Encryptを利用するためのアプリケーションは”certbot”という名前でパッケージ化されています。
certbotはCentOSのベースレポジトリには含まれておらず、epelレポジトリに含まれています。epelレポジトリはphpの7.2系を導入する際にインストールされていますので、ここでは導入は不要ですが、確認だけは行っておきます。
4-1-1. epelレポジトリの確認
epelレポジトリがインストールされたことを確認します。インストールされているパッケージはyumコマンドで確認できます。以下のようにyumを実行することで、epelレポジトリがインストールされていることを確認します。
$ yum list installed | grep epel
出力結果として、epelレポジトリパッケージが表示されることを確認します。
epel-release.noarch 7-9 @extras
上記の応答結果から、epelレポジトリパッケージがインストールされていることが確認できました。
epelがレポジトリリストに追加されていることを確認します。以下のように実行することで、現在、利用が可能なレポジトリリストを確認できます。
$ yum repolist
応答結果にepelが表示されればepelレポジトリを利用する準備は完了しています。
Loading mirror speeds from cached hostfile
* base: ftp.yz.yamagata-u.ac.jp
* epel: ftp.yz.yamagata-u.ac.jp
* extras: ftp.yz.yamagata-u.ac.jp
* updates: ftp.yz.yamagata-u.ac.jp
リポジトリー ID リポジトリー名 状態
!base/7/x86_64 CentOS-7 - Base 9,591
!epel/x86_64 Extra Packages for Enterprise Linux 7 - x86_64 12,507
!extras/7/x86_64 CentOS-7 - Extras 448
!updates/7/x86_64 CentOS-7 - Updates 2,416
repolist: 24,962
これでepelレポジトリの確認は完了です。
4-2. certbotパッケージのインストール
epelレポジトリに含まれるcertbotパッケージを確認します。
読み込んだプラグイン:fastestmirror
Loading mirror speeds from cached hostfile
* base: ftp.tsukuba.wide.ad.jp
* epel: ftp.tsukuba.wide.ad.jp
* extras: ftp.tsukuba.wide.ad.jp
* updates: ftp.tsukuba.wide.ad.jp
====================== N/S matched: certbot =================
python2-certbot.noarch : Python 2 libraries used by certbot
python2-certbot-apache.noarch : The apache plugin for certbot
python2-certbot-dns-cloudflare.noarch : Cloudflare DNS Authenticator plugin for Certbot
python2-certbot-dns-cloudxns.noarch : CloudXNS DNS Authenticator plugin for Certbot
python2-certbot-dns-digitalocean.noarch : DigitalOcean DNS Authenticator plugin for Certbot
python2-certbot-dns-dnsimple.noarch : DNSimple DNS Authenticator plugin for Certbot
python2-certbot-dns-dnsmadeeasy.noarch : DNS Made Easy DNS Authenticator plugin for Certbot
python2-certbot-dns-google.noarch : Google Cloud DNS Authenticator plugin for Certbot
python2-certbot-dns-luadns.noarch : LuaDNS Authenticator plugin for Certbot
python2-certbot-dns-nsone.noarch : NS1 DNS Authenticator plugin for Certbot
python2-certbot-dns-rfc2136.noarch : RFC 2136 DNS Authenticator plugin for Certbot
python2-certbot-dns-route53.noarch : Route53 DNS Authenticator plugin for Certbot
python2-certbot-nginx.noarch : The nginx plugin for certbot
certbot.noarch : A free, automated certificate authority client
Name and summary matches only, use "search all" for everything.
今度は上記のようにcertbotに関するパッケージが表示されました。この中でnginx環境でLet's Encryptを利用するのに必要なパッケージは
- certbot.noarch : A free, automated certificate authority client
のになります。このパッケージをインストールします。以下のコマンドでcertbotパッケージをインストールします。
# yum -y install certbot
実行結果は以下のようになります。
Loading mirror speeds from cached hostfile
* base: ftp.tsukuba.wide.ad.jp
* epel: ftp.iij.ad.jp
* extras: ftp.tsukuba.wide.ad.jp
* remi-safe: ftp.riken.jp
* updates: ftp.tsukuba.wide.ad.jp
依存性の解決をしています
--> トランザクションの確認を実行しています。
---> パッケージ certbot.noarch 0:0.24.0-1.el7 を インストール
--> 依存性の処理をしています: python2-certbot > 0.21.1 のパッケージ: certbot-0.24.0-1.el7.noarch
--> 依存性の処理をしています: /usr/sbin/semanage のパッケージ: certbot-0.24.0-1.el7.noarch
--> トランザクションの確認を実行しています。
---> パッケージ policycoreutils-python.x86_64 0:2.5-22.el7 を インストール
--> トランザクションの確認を実行しています。
---> パッケージ audit-libs-python.x86_64 0:2.8.1-3.el7 を インストール
---> パッケージ checkpolicy.x86_64 0:2.5-6.el7 を インストール
---> パッケージ libcgroup.x86_64 0:0.41-15.el7 を インストール
---> パッケージ libsemanage-python.x86_64 0:2.5-11.el7 を インストール
---> パッケージ python-IPy.noarch 0:0.75-6.el7 を インストール
---> パッケージ python-zope-component.noarch 1:4.1.0-3.el7 を インストール
---> パッケージ python-zope-interface.x86_64 0:4.0.5-4.el7 を インストール
---> パッケージ python2-acme.noarch 0:0.24.0-1.el7 を インストール
---> パッケージ python2-future.noarch 0:0.16.0-6.el7 を インストール
---> パッケージ python2-josepy.noarch 0:1.1.0-1.el7 を インストール
---> パッケージ python2-mock.noarch 0:1.0.1-9.el7 を インストール
---> パッケージ python2-parsedatetime.noarch 0:2.4-5.el7 を インストール
---> パッケージ python2-pyrfc3339.noarch 0:1.0-2.el7 を インストール
---> パッケージ pytz.noarch 0:2016.10-2.el7 を インストール
---> パッケージ setools-libs.x86_64 0:3.3.8-2.el7 を インストール
--> トランザクションの確認を実行しています。
---> パッケージ pyOpenSSL.x86_64 0:0.13.1-3.el7 を インストール
---> パッケージ python-cffi.x86_64 0:1.6.0-5.el7 を インストール
---> パッケージ python-chardet.noarch 0:2.2.1-1.el7_1 を インストール
---> パッケージ python-ply.noarch 0:3.4-11.el7 を インストール
---> パッケージ python-urllib3.noarch 0:1.10.2-5.el7 を インストール
--> 依存性解決を終了しました。
依存性を解決しました
インストール中:
certbot noarch 0.24.0-1.el7 epel 21 k
依存性関連でのインストールをします:
audit-libs-python x86_64 2.8.1-3.el7 base 75 k
checkpolicy x86_64 2.5-6.el7 base 294 k
libcgroup x86_64 0.41-15.el7 base 65 k
libsemanage-python x86_64 2.5-11.el7 base 112 k
policycoreutils-python x86_64 2.5-22.el7 base 454 k
pyOpenSSL x86_64 0.13.1-3.el7 base 133 k
python-IPy noarch 0.75-6.el7 base 32 k
python-cffi x86_64 1.6.0-5.el7 base 218 k
python-chardet noarch 2.2.1-1.el7_1 base 227 k
python-enum34 noarch 1.0.4-1.el7 base 52 k
python-idna noarch 2.4-1.el7 base 94 k
python-ndg_httpsclient noarch 0.3.2-1.el7 epel 43 k
python-ply noarch 3.4-11.el7 base 123 k
python-pycparser noarch 2.14-1.el7 base 104 k
python-requests noarch 2.6.0-1.el7_1 base 94 k
python-six noarch 1.9.0-2.el7 base 29 k
python-urllib3 noarch 1.10.2-5.el7 base 102 k
python-zope-component noarch 1:4.1.0-3.el7 epel 227 k
python-zope-event noarch 4.0.3-2.el7 epel 79 k
python-zope-interface x86_64 4.0.5-4.el7 base 138 k
python2-acme noarch 0.24.0-1.el7 epel 135 k
python2-certbot noarch 0.24.0-1.el7 epel 493 k
python2-configargparse noarch 0.11.0-1.el7 epel 30 k
python2-cryptography x86_64 1.7.2-2.el7 base 502 k
python2-future noarch 0.16.0-6.el7 epel 799 k
python2-josepy noarch 1.1.0-1.el7 epel 87 k
python2-mock noarch 1.0.1-9.el7 epel 92 k
python2-parsedatetime noarch 2.4-5.el7 epel 78 k
python2-pyasn1 noarch 0.1.9-7.el7 base 100 k
python2-pyrfc3339 noarch 1.0-2.el7 epel 13 k
python2-requests noarch 2.6.0-0.el7 epel 2.9 k
python2-six noarch 1.9.0-0.el7 epel 2.9 k
pytz noarch 2016.10-2.el7 base 46 k
setools-libs x86_64 3.3.8-2.el7 base 619 k
トランザクションの要約
インストール 1 パッケージ (+34 個の依存関係のパッケージ)
総ダウンロード容量: 5.6 M
インストール容量: 24 M
Downloading packages:
(1/35): audit-libs-python-2.8.1-3.el7.x86_64.rpm | 75 kB 00:00:00
(2/35): certbot-0.24.0-1.el7.noarch.rpm | 21 kB 00:00:00
(3/35): libcgroup-0.41-15.el7.x86_64.rpm | 65 kB 00:00:00
(4/35): libsemanage-python-2.5-11.el7.x86_64.rpm | 112 kB 00:00:00
(5/35): policycoreutils-python-2.5-22.el7.x86_64.rpm | 454 kB 00:00:00
(6/35): checkpolicy-2.5-6.el7.x86_64.rpm | 294 kB 00:00:00
(7/35): pyOpenSSL-0.13.1-3.el7.x86_64.rpm | 133 kB 00:00:00
(8/35): python-IPy-0.75-6.el7.noarch.rpm | 32 kB 00:00:00
(9/35): python-idna-2.4-1.el7.noarch.rpm | 94 kB 00:00:00
(10/35): python-chardet-2.2.1-1.el7_1.noarch.rpm | 227 kB 00:00:00
(11/35): python-ply-3.4-11.el7.noarch.rpm | 123 kB 00:00:00
(12/35): python-enum34-1.0.4-1.el7.noarch.rpm | 52 kB 00:00:00
(13/35): python-pycparser-2.14-1.el7.noarch.rpm | 104 kB 00:00:00
(35/35): pytz-2016.10-2.el7.noarch.rpm | 46 kB 00:00:00
Running transaction check
Running transaction test
Transaction test succeeded
Running transaction
インストール中 : python-six-1.9.0-2.el7.noarch 1/35
インストール中 : python2-pyasn1-0.1.9-7.el7.noarch 2/35
インストール中 : pyOpenSSL-0.13.1-3.el7.x86_64 3/35
インストール中 : python-zope-interface-4.0.5-4.el7.x86_64 4/35
インストール中 : pytz-2016.10-2.el7.noarch 5/35
インストール中 : python2-pyrfc3339-1.0-2.el7.noarch 6/35
インストール中 : python2-future-0.16.0-6.el7.noarch 7/35
インストール中 : python2-parsedatetime-2.4-5.el7.noarch 8/35
インストール中 : python-ndg_httpsclient-0.3.2-1.el7.noarch 9/35
インストール中 : python2-six-1.9.0-0.el7.noarch 10/35
インストール中 : python-urllib3-1.10.2-5.el7.noarch 11/35
インストール中 : checkpolicy-2.5-6.el7.x86_64 12/35
インストール中 : python-chardet-2.2.1-1.el7_1.noarch 13/35
インストール中 : python-requests-2.6.0-1.el7_1.noarch 14/35
インストール中 : python2-requests-2.6.0-0.el7.noarch 15/35
インストール中 : python-zope-event-4.0.3-2.el7.noarch 16/35
インストール中 : 1:python-zope-component-4.1.0-3.el7.noarch 17/35
インストール中 : python2-mock-1.0.1-9.el7.noarch 18/35
インストール中 : audit-libs-python-2.8.1-3.el7.x86_64 19/35
インストール中 : python-ply-3.4-11.el7.noarch 20/35
インストール中 : python-pycparser-2.14-1.el7.noarch 21/35
インストール中 : python-cffi-1.6.0-5.el7.x86_64 22/35
インストール中 : libcgroup-0.41-15.el7.x86_64 23/35
インストール中 : python-idna-2.4-1.el7.noarch 24/35
インストール中 : python-IPy-0.75-6.el7.noarch 25/35
インストール中 : python-enum34-1.0.4-1.el7.noarch 26/35
インストール中 : python2-cryptography-1.7.2-2.el7.x86_64 27/35
インストール中 : python2-josepy-1.1.0-1.el7.noarch 28/35
インストール中 : python2-acme-0.24.0-1.el7.noarch 29/35
インストール中 : setools-libs-3.3.8-2.el7.x86_64 30/35
インストール中 : python2-configargparse-0.11.0-1.el7.noarch 31/35
インストール中 : python2-certbot-0.24.0-1.el7.noarch 32/35
インストール中 : libsemanage-python-2.5-11.el7.x86_64 33/35
インストール中 : policycoreutils-python-2.5-22.el7.x86_64 34/35
インストール中 : certbot-0.24.0-1.el7.noarch 35/35
検証中 : python-zope-interface-4.0.5-4.el7.x86_64 33/35
検証中 : python2-cryptography-1.7.2-2.el7.x86_64 34/35
検証中 : checkpolicy-2.5-6.el7.x86_64 35/35
インストール:
certbot.noarch 0:0.24.0-1.el7
依存性関連をインストールしました:
audit-libs-python.x86_64 0:2.8.1-3.el7 checkpolicy.x86_64 0:2.5-6.el7
libcgroup.x86_64 0:0.41-15.el7 libsemanage-python.x86_64 0:2.5-11.el7
policycoreutils-python.x86_64 0:2.5-22.el7 pyOpenSSL.x86_64 0:0.13.1-3.el7
python-IPy.noarch 0:0.75-6.el7 python-cffi.x86_64 0:1.6.0-5.el7
python-chardet.noarch 0:2.2.1-1.el7_1 python-enum34.noarch 0:1.0.4-1.el7
python-idna.noarch 0:2.4-1.el7 python-ndg_httpsclient.noarch 0:0.3.2-1.el7
python-ply.noarch 0:3.4-11.el7 python-pycparser.noarch 0:2.14-1.el7
python-requests.noarch 0:2.6.0-1.el7_1 python-six.noarch 0:1.9.0-2.el7
python-urllib3.noarch 0:1.10.2-5.el7 python-zope-component.noarch 1:4.1.0-3.el7
python-zope-event.noarch 0:4.0.3-2.el7 python-zope-interface.x86_64 0:4.0.5-4.el7
python2-acme.noarch 0:0.24.0-1.el7 python2-certbot.noarch 0:0.24.0-1.el7
python2-configargparse.noarch 0:0.11.0-1.el7 python2-cryptography.x86_64 0:1.7.2-2.el7
python2-future.noarch 0:0.16.0-6.el7 python2-josepy.noarch 0:1.1.0-1.el7
python2-mock.noarch 0:1.0.1-9.el7 python2-parsedatetime.noarch 0:2.4-5.el7
python2-pyasn1.noarch 0:0.1.9-7.el7 python2-pyrfc3339.noarch 0:1.0-2.el7
python2-requests.noarch 0:2.6.0-0.el7 python2-six.noarch 0:1.9.0-0.el7
pytz.noarch 0:2016.10-2.el7 setools-libs.x86_64 0:3.3.8-2.el7
完了しました!
エラーの出力がなく”完了しました!”と表示されれば、certbotパッケージは正常にインストールされています。
4-3. certbotインストール後の確認
certbotがインストールされたことを確認します。インストールされているパッケージはyumコマンドで確認できます。以下のようにyumを実行することで、certbotパッケージがインストールされていることを確認します。
$ yum list installed | grep certbot
certbot.noarch 0.24.0-1.el7 @epel
python2-certbot.noarch 0.24.0-1.el7 @epel
結果として上記のように”certbot””python2-certbot”が表示されればパッケージはインストールされています。
続いてcertbotがインストールされた場所を確認します。インストールされた場所(パス)を確認するためにはwhichコマンドを利用します。以下のように実行することでインストールパスを確認できます。
$ which certbot
/bin/certbot
この結果から、certbotが/bin以下にインストールされたことが確認できます。これでcertbotのインストールが正常に終了したことが確認できました。
5. サーバー証明書の作成
ここまででサーバー証明書を作成するためのcertbotパッケージがインストールされましたので、certbotコマンドを利用してサーバー証明書を作成する手順を紹介していきます。本環境ではバーチャルホストが二つ用意されていますので、各バーチャルホスト事にコマンドを実行します。
5-1. certbotコマンドの実行 www.testdom.com用
Let's Encryptによるサーバー証明書はcertbotコマンドで作成します。nginxに設定したバーチャルホストのドキュメントルートが”/home/www/www.testdom.com/”でFQDNのホスト名が”www.testdom.com”の場合、以下のように実行します。
# certbot certonly --webroot -w /home/www/www.testdom.com/ -d www.testdom.com
”testdom.com”でもアクセスを行う(wwwのホスト部分が無い)場合は、以下のようにtestdom.comも追加します。本環境ではホスト部分無しでもアクセスしたいので、こちらで実行します。
# certbot certonly --webroot -w /home/www/www.testdom.com/ -d www.testdom.com -d testdom.com
実行すると初回の実行時のみ、以下のように対話型のウィザードが起動します。
幾つかの質問がありますので、回答します。
Plugins selected: Authenticator webroot, Installer None
Enter email address (used for urgent renewal and security notices) (Enter 'c' to cancel): info@testdom.com <=メールアドレスを入力
Starting new HTTPS connection (1): acme-v01.api.Let'sEncrypt.org
-------------------------------------------------------------------------------
Please read the Terms of Service at
https://letsencrypt.org/documents/LE-SA-v1.2-November-15-2017.pdf. You must
agree in order to register with the ACME server at
https://acme-v01.api.letsencrypt.org/directory
-------------------------------------------------------------------------------
(A)gree/(C)ancel: A <=利用規約に了解するかを回答(Aを入力)
-------------------------------------------------------------------------------
Would you be willing to share your email address with the Electronic Frontier
Foundation, a founding partner of the Let's Encrypt project and the non-profit
organization that develops Certbot? We'd like to send you email about EFF and
our work to Encrypt the web, protect its users and defend digital rights.
-------------------------------------------------------------------------------
(Y)es/(N)o: N <=メーリングリストに入るかの選択(任意)
回答が終わると、証明書の作成が始まります。
Performing the following challenges:
http-01 challenge for www.testdom.com
http-01 challenge for testdom.com
Using the webroot path /home/www/html for all unmatched domains.
Waiting for verification...
Cleaning up challenges
IMPORTANT NOTES:
- Congratulations! Your certificate and chain have been saved at:
/etc/letsencrypt/live/www.testdom.com/fullchain.pem
Your key file has been saved at:
/etc/letsencrypt/live/www.testdom.com/privkey.pem
Your cert will expire on 2018-07-22. To obtain a new or tweaked
version of this certificate in the future, simply run certbot
again. To non-interactively renew *all* of your certificates, run
"certbot renew"
- Your account credentials have been saved in your Certbot
configuration directory at /etc/letsencrypt. You should make a
secure backup of this folder now. This configuration directory will
also contain certificates and private keys obtained by Certbot so
making regular backups of this folder is ideal.
- If you like Certbot, please consider supporting our work by:
Donating to ISRG / Let's Encrypt: https://letsencrypt.org/donate
Donating to EFF: https://eff.org/donate-le
上記のように”Congratulations!”と表示されればサーバー証明書の作成は完了です。サーバー証明書の保存場所は上記にも記載されているように/etc/letsencrypt/live/www.testdom.com/ディレクトリになります。(FQDN名のディレクトリは自動的に作成されます。)
5-2. certbotコマンドの実行 www.testdom2.com用
もう一つのバーチャルホスト用に証明書を作成します。nginxに設定したドキュメントルートが”/home/www/www.testdom2.com/”でFQDNのホスト名が”www.testdom2.com”の場合、以下のように実行します。
# certbot certonly --webroot -w /home/www/www.testdom2.com/ -d www.testdom2.com
もし”testdom.com”でもアクセスを行う(wwwのホスト部分が無い)場合は、以下のようにtestdom.comも追加します。本環境ではホスト部分無しでもアクセスしたいので、こちらで実行します。
# certbot certonly --webroot -w /home/www/www.testdom2.com/ -d www.testdom2.com -d testdom2.com
実行すると、以下のように対話型のウィザードが起動します。二回目の実行の場合は質問はありません。
Plugins selected: Authenticator webroot, Installer None
Starting new HTTPS connection (1): acme-v01.api.Let'sEncrypt.org
Obtaining a new certificate
Performing the following challenges:
http-01 challenge for www.testdom2.com
http-01 challenge for testdom2.com
Using the webroot path /home/www/www.testdom2.com for all unmatched domains.
Waiting for verification...
Cleaning up challenges
IMPORTANT NOTES:
- Congratulations! Your certificate and chain have been saved at:
/etc/letsencrypt/live/www.testdom2.com/fullchain.pem
Your key file has been saved at:
/etc/letsencrypt/live/www.testdom2.com/privkey.pem
Your cert will expire on 2018-07-22. To obtain a new or tweaked
version of this certificate in the future, simply run certbot
again. To non-interactively renew *all* of your certificates, run
"certbot renew"
- Your account credentials have been saved in your Certbot
configuration directory at /etc/letsencrypt. You should make a
secure backup of this folder now. This configuration directory will
also contain certificates and private keys obtained by Certbot so
making regular backups of this folder is ideal.
- If you like Certbot, please consider supporting our work by:
Donating to ISRG / Let's Encrypt: https://letsencrypt.org/donate
Donating to EFF: https://eff.org/donate-le
上記のように”Congratulations!”と表示されればサーバー証明書の作成は完了です。サーバー証明書の保存場所は上記にも記載されているように/etc/letsencrypt/live/www.testdom2.com/ディレクトリになります。(FQDN名のディレクトリは自動的に作成されます。)
5-3. サーバー証明書ファイルの確認
実際に作成されたサーバー証明書ファイルを確認してみます。作成ディレクトリへ移動します。
$ cd /etc/letsencrypt/live/www.testdom.com
ファイルを確認します。
$ ls
README cert.pem chain.pem fullchain.pem privkey.pem
ファイルが作成されていることが確認できました。同じくwww.testdom2.comも確認します。
$ cd /etc/letsencrypt/live/www.testdom2.com
ファイルを確認します。
$ ls
README cert.pem chain.pem fullchain.pem privkey.pem
こちらもファイルが作成されていることが確認できました。
ファイル構成は以下のようになります。
|-- www.testdom.com
| |-- README
| |-- cert.pem -> ../../archive/www.testdom.com/cert1.pem
| |-- chain.pem -> ../../archive/www.testdom.com/chain1.pem
| |-- fullchain.pem -> ../../archive/www.testdom.com/fullchain1.pem
| `-- privkey.pem -> ../../archive/www.testdom.com/privkey1.pem
`-- www.testdom2.com
|-- README
|-- cert.pem -> ../../archive/www.testdom2.com/cert1.pem
|-- chain.pem -> ../../archive/www.testdom2.com/chain1.pem
|-- fullchain.pem -> ../../archive/www.testdom2.com/fullchain1.pem
`-- privkey.pem -> ../../archive/www.testdom2.com/privkey1.pem
作成された証明書用ファイルの役割は以下の通りです。
- cert.pem サーバー証明書本体
- chain.pem 中間証明書
- privkey.pem 秘密鍵ファイル
- fullchain.pem サーバー証明書と中間証明書のセット
このファイルのうちnginxで利用するものは”fullchain.pem” ”privkey.pem”の2ファイルになります。fullchain.pemはウェブサーバーとしてnginx、かhttpd(Apache)のバージョンが2.4.8以降の場合利用する中間証明書を含んだ証明書ファイルになります。これでサーバー証明書の作成と確認は完了です。
5-4. dhparam用ファイルの作成
nginxのSSLを設定する際に、必要なパラメーターとして”ssl_dhparam”があります。これはnginxの1.11.0から必須になったパラメーターで、鍵交換アルゴリズムで使用される素数を格納するファイルになります。
このファイルはopensslコマンドで作成する必要がありますので、その手順を紹介します。ファイルを保存するパスは”/etc/nginx/ssl/"を指定します。
5-4-1. ファイルの保存用ディレクトリ作成
dhparam用ファイルを保存する先のディレクトリ(/etc/nginx/ssl)を作成します。mkdirコマンドを実行します。
# mkdir /etc/nginx/ssl
特にエラーなどのメッセージが出力されなければ、ディレクトリを作成は完了です。
5-4-2. opensslコマンドによるファイルの作成
opensslコマンドでdhparam用ファイルを作成します。以下のように実行します。
# openssl dhparam -out /etc/nginx/ssl/dhparam.pem 2048
実行結果は以下のようになります。
This is going to take a long time
................................................+..................................................
....................+..............................................................................
【略】
........................................+..........................................+...............
.............++*++*
サーバーの性能によっては、かなり時間が掛かりますが、途中で止めずに暫く待ってみて下さい。(多分、終わります!)
エラーが表示されずにプロンプトに戻れば、コマンドの実行は完了です。
作成されたファイルを確認します。
# ls -a /etc/nginx/ssl/
. .. dhparam.pem
上記のようにファイルが作成されていることが確認できます。この時点でのディレクトリツリーは以下のようになります。
|-- conf.d
|-- fastcgi_params
|-- koi-utf
|-- koi-win
|-- mime.types
|-- modules -> ../../usr/lib64/nginx/modules
|-- nginx.conf
|-- nginx.conf.org
|-- scgi_params
|-- sites-available
| |-- default.conf
| |-- www.testdom.com.conf
| |-- www.testdom2.com.conf
|-- sites-enabled
| |-- default.conf -> ../sites-available/default.conf
| |-- www.testdom.com.conf -> ../sites-available/www.testdom.com.conf
| `-- www.testdom2.com.conf -> /etc/nginx/sites-available/www.testdom2.com.conf
|-- ssl
| `-- dhparam.pem
|-- uwsgi_params
`-- win-utf
一度、実際の環境と比較してみて下さい。
6. nginxへのSSL通信用の設定
「項目5. サーバー証明書の作成」でサーバー証明書ファイルの作成まで完了しましたので、ウェブサーバーであるnginx側へSSLの設定を行います。設定が必要なファイルはバーチャルホスト用の設定ファイル”ドメイン名”.confになります。
以下が現状のフォルダとファイルの構成です。
|-- conf.d
|-- fastcgi_params
|-- koi-utf
|-- koi-win
|-- mime.types
|-- modules -> ../../usr/lib64/nginx/modules
|-- nginx.conf
|-- scgi_params
|-- sites-available
| |-- default.conf
| |-- www.testdom.com.conf
| |-- www.testdom2.com.conf
|-- sites-enabled
| |-- default.conf -> /etc/nginx/sites-available/default.conf
| |-- www.testdom.com.conf -> /etc/nginx/sites-available/www.testdom.com.conf
| `-- www.testdom2.com.conf -> /etc/nginx/sites-available/www.testdom2.com.conf
|-- ssl
| `-- dhparam.pem
|-- uwsgi_params
`-- win-utf
上記ディレクトリツリー上の”sites-available”ディレクトリに含まれる設定ファイル”www.testdom.com.conf”と”www.testdom2.com.conf”が設定の対象です。
6-1. www.testdom.com.conf設定ファイルのバックアップ
HTTPS通信に関する設定はバーチャルホスト用設定ファイルであるwww.testdom.com.confに行います。先ずはこのファイルをバックアップします。
以下の手順でコピーを行います。
# cp -p /etc/nginx/sites-available/www.testdom.com.conf /etc/nginx/sites-available/www.testdom.com.conf.org
コピーされたバックアップファイルが存在することを確認します。
$ ls /etc/nginx/sites-available/
default.conf www.testdom.com.conf www.testdom.com.conf.org www.testdom2.com.conf
コピーしたファイル”www.testdom.com.conf.org”があることが確認できました。
6-2. www.testdom.com.conf 設定ファイルの編集
ファイルのバックアップが完了しましたのでwww.testdom.com.conを編集していきます。本記事では、HTTPS通信を行うために必要な設定を行う前提としています。先ずは稼働させてみて、必要に応じて、運用後に調整行っても良いと思います。
viテキストエディタで、www.testdom.com.conを開きます。
# vi /etc/nginx/sites-available/www.testdom.com.conf
ファイルの内容は以下になります。前回の記事
>「CentOS 7のnginxでPHP7を利用する。最短でPHP7系の環境を構築する手順。」
でphp(php-fpm)が動作するところまでの設定が完了している環境が前提です。
server {
listen 80;
server_name testdom.com www.testdom.com;
access_log /var/log/nginx/www.testdom.com-access.log main;
error_log /var/log/nginx/www.testdom.com-error.log;
root /home/www/www.testdom.com;
location / {
index index.php index.html index.htm;
}
location ~ \.php$ {
fastcgi_pass 127.0.0.1:9000;
fastcgi_index index.php;
fastcgi_param SCRIPT_FILENAME $document_root$fastcgi_script_name;
include fastcgi_params;
}
}
この内容をSSLに対応させるため、以下のように変更します。
server {
listen 80;
server_name testdom.com www.testdom.com;
rewrite ^ https://$server_name$request_uri? permanent;
}
server {
listen 443 ssl;
server_name testdom.com www.testdom.com;
access_log /var/log/nginx/www.testdom.com-access.log main;
error_log /var/log/nginx/www.testdom.com-error.log;
root /home/www/www.testdom.com;
ssl_certificate /etc/letsencrypt/live/www.testdom.com/fullchain.pem;
ssl_certificate_key /etc/letsencrypt/live/www.testdom.com/privkey.pem;
ssl_session_timeout 1d;
ssl_session_cache shared:SSL:50m;
ssl_session_tickets on;
ssl_dhparam /etc/nginx/ssl/dhparam.pem;
ssl_protocols TLSv1 TLSv1.1 TLSv1.2;
ssl_ciphers HIGH:!aNULL:!MD5;
ssl_prefer_server_ciphers on;
location / {
index index.php index.html index.htm;
}
location ~ \.php$ {
fastcgi_pass 127.0.0.1:9000;
fastcgi_index index.php;
fastcgi_param SCRIPT_FILENAME $document_root$fastcgi_script_name;
include fastcgi_params;
}
}
各設定項目の詳細を説明します。まず、最初のserverディレクティブは以下のように変更します。
server {
listen 80;
server_name testdom.com www.testdom.com;
rewrite ^ https://$server_name$request_uri? permanent;
}
上記はバーチャルホストの名前と、通常のHTTPでリクエストがあったアクセスをHTTPSへリダイレクトするための設定です。
次のserverディレクティブがバーチャルホストとSSL通信を有効にするための設定です。
listen 443 ssl;
server_name testdom.com www.testdom.com;
access_log /var/log/nginx/www.testdom.com-access.log main;
error_log /var/log/nginx/www.testdom.com-error.log;
ここまでがバーチャルホストの基本設定になります。バーチャルホスト名とアクセスログ、待ち受けポートの設定です。
次にSSLの詳細な設定になります。証明書ファイルのパスや、セッション時間の設定、有効化する暗号化アルゴリズムを設定します。この部分はある程度、変更頂いてもよいかと思います。
ssl_certificate /etc/letsencrypt/live/www.testdom.com/fullchain.pem;
ssl_certificate_key /etc/letsencrypt/live/www.testdom.com/privkey.pem;
ssl_session_timeout 1d;
ssl_session_cache shared:SSL:50m;
ssl_session_tickets on;
ssl_dhparam /etc/nginx/ssl/dhparam.pem;
ssl_protocols TLSv1 TLSv1.1 TLSv1.2;
ssl_ciphers HIGH:!aNULL:!MD5;
ssl_prefer_server_ciphers on;
本設定で重要な部分は、ssl_certificateの部分です。Let's Encryptで作成したバーチャルホストの証明書ファイルのパスを指定します。
またssl_dhparamについては最近のnginxの場合、設定を推奨する項目になっています。こちらについては証明書ファイルを作成する必要があります。「項目5. サーバー証明書の作成」で作成したdhparam用ファイルのパスを指定します。
最後にバーチャルホストのドキュメントルートとphpの動作設定です。この項目については基本的には変更はありません。
location / {
index index.php index.html index.htm;
}
location ~ \.php$ {
fastcgi_pass 127.0.0.1:9000;
fastcgi_index index.php;
fastcgi_param SCRIPT_FILENAME $document_root$fastcgi_script_name;
include fastcgi_params;
}
上記のようにlocationディレクティブを記載する場所の変更が必要になります。全ての変更が完了できたらファイルを保存します。
6-3. www.testdom2.com.conf 設定ファイルの編集
「項目6-2. www.testdom.com.conf 設定ファイルの編集」と同じようにバーチャルホスト用の設定ファイルであるwww.testdom2.com.confをSSLに対応させるように変更します。変更点はwww.testdom.com.confと同じになりますので、ここでは変更前のファイルと変更後のファイルを紹介します。
server {
listen 80;
server_name testdom2.com www.testdom2.com;
access_log /var/log/nginx/www.testdom2.com-access.log main;
error_log /var/log/nginx/www.testdom2.com-error.log;
root /home/www/www.testdom2.com;
location / {
index index.php index.html index.htm;
}
location ~ \.php$ {
fastcgi_pass 127.0.0.1:9000;
fastcgi_index index.php;
fastcgi_param SCRIPT_FILENAME $document_root$fastcgi_script_name;
include fastcgi_params;
}
}
この内容ををSSにL対応させるため、以下のように変更します。
server {
listen 80;
server_name testdom2.com www.testdom2.com;
rewrite ^ https://$server_name$request_uri? permanent;
}
server {
listen 443 ssl;
server_name testdom2.com www.testdom2.com;
access_log /var/log/nginx/www.testdom2.com-access.log main;
error_log /var/log/nginx/www.testdom2.com-error.log;
root /home/www/www.testdom2.com;
ssl_certificate /etc/letsencrypt/live/www.testdom2.com/fullchain.pem;
ssl_certificate_key /etc/letsencrypt/live/www.testdom2.com/privkey.pem;
ssl_session_timeout 1d;
ssl_session_cache shared:SSL:50m;
ssl_session_tickets on;
ssl_dhparam /etc/nginx/ssl/dhparam.pem;
ssl_protocols TLSv1 TLSv1.1 TLSv1.2;
ssl_ciphers HIGH:!aNULL:!MD5;
ssl_prefer_server_ciphers on;
location / {
index index.php index.html index.htm;
}
location ~ \.php$ {
fastcgi_pass 127.0.0.1:9000;
fastcgi_index index.php;
fastcgi_param SCRIPT_FILENAME $document_root$fastcgi_script_name;
include fastcgi_params;
}
}
上記の変更後にwww.testdom2.confファイルを保存します。これで設定ファイルの変更は完了です。
6-4. バーチャルホスト用の設定ファイルの確認
項目6-2. と項目6-3. で変更したファイルに誤りが無いかをコマンドで確認します。確認はnginxコマンドを以下のように実行します。
# nginx -t
nginx: the configuration file /etc/nginx/nginx.conf syntax is ok
nginx: configuration file /etc/nginx/nginx.conf test is successful
上記のように” test is successful”と表示されれば、設定ファイルには問題ありません。これでバーチャルホスト用設定ファイルの確認は完了です。
6-5. nginxの再起動
ファイルの変更を行った場合には設定ファイルの再読み込みとして、nginxの再起動が必要になります。systemctlコマンドでnginxを再起動します。
# systemctl restart nginx
エラーが出力されなければ、正常に再起動は完了しています。
再起動後にnginxのstatusを確認します。
Loaded: loaded (/usr/lib/systemd/system/nginx.service; enabled; vendor preset: disabled)
Active: active (running) since 水 2018-06-27 12:06:13 JST; 23h ago
Docs: http://nginx.org/en/docs/
Process: 9035 ExecStop=/bin/kill -s TERM $MAINPID (code=exited, status=0/SUCCESS)
Process: 9038 ExecStart=/usr/sbin/nginx -c /etc/nginx/nginx.conf (code=exited, status=0/SUCCESS)
Main PID: 9039 (nginx)
CGroup: /system.slice/nginx.service
tq9039 nginx: master process /usr/sbin/nginx -c /etc/nginx/nginx.conf
mq9040 nginx: worker process
6月 27 12:06:13 www2 systemd[1]: Starting nginx - high performance web server...
6月 27 12:06:13 www2 systemd[1]: PID file /var/run/nginx.pid not readable (yet?) after start.
6月 27 12:06:13 www2 systemd[1]: Started nginx - high performance web server.
上記の出力結果から、nginxは正常に再起動していることが確認できます。
これでバーチャルホスト側の設定は完了です。引き続き、HTTPS通信の動作確認を行います。
7. HTTPSの動作確認
「項目6. nginxへのSSL通信用の設定」まででHTTPS通信の設定が完了しましたので、ここからは実際にブラウザでサイトへ接続して、正常にHTTPSが動作していることを確認していきます。利用しているブラウザはGoogle Chromeになります。
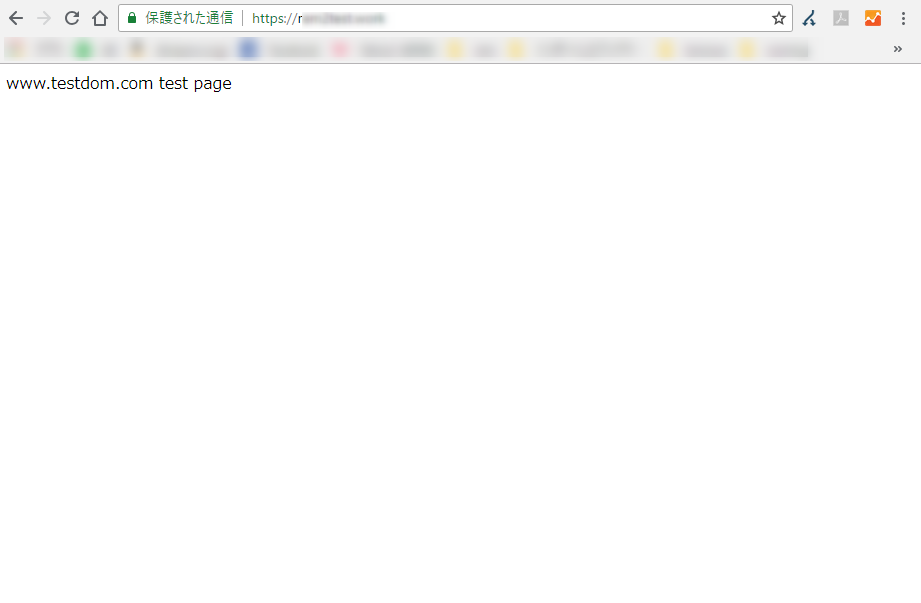
7-1. ブラウザでの接続確認 www.testdom.com
利用しているブラウザにURLを入力します。以前は保護されていないと表示された部分が「保護された通信」に変わっています。この状態は正常にHTTPS通信が出来ている場合に表示されます。
7-2. サーバー証明書の確認 www.testdom.com
Google Chromeのデベロッパーツール(その他のツール=>デベロッパーツール)を起動して通信に問題がないことを確認します。以下のように表示されていれば、通信はセキュアに行われています。
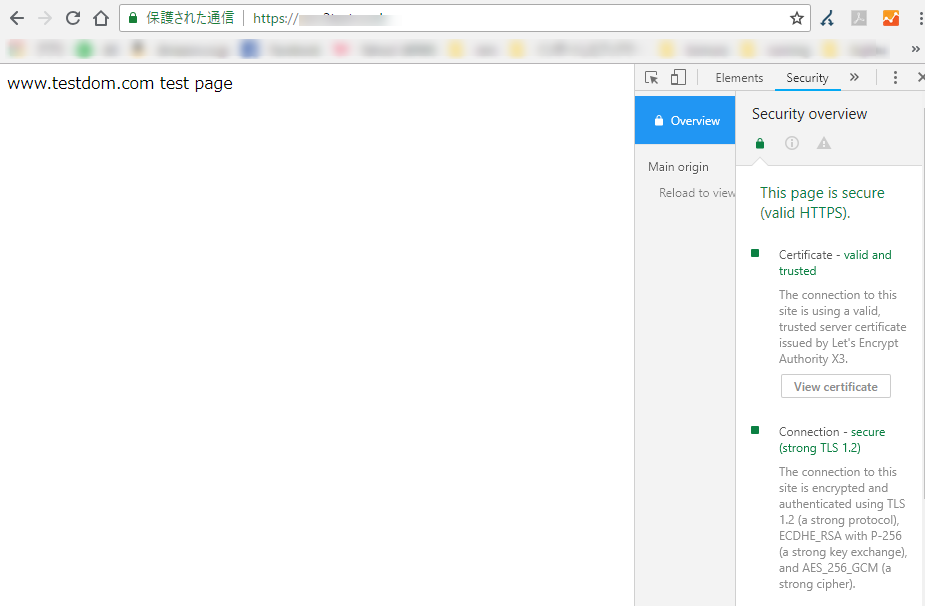
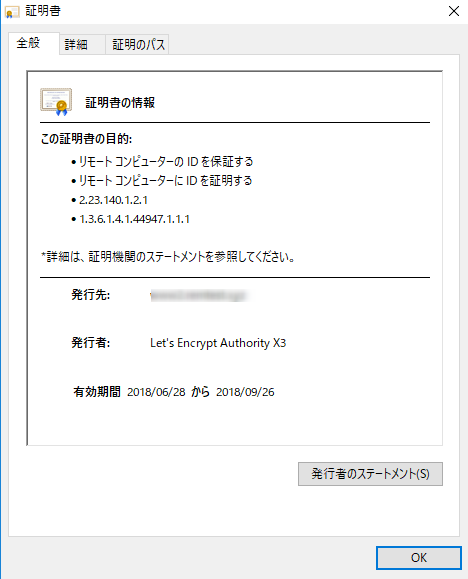
また[View certificate]をクリックすると、サーバー証明書が確認できます。
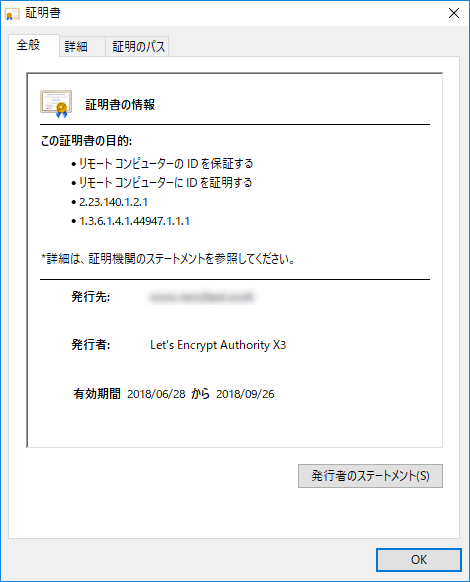
これでHTTPS通信が正常に行われていることが確認できました。作成したテスト用のindex.htmlファイルは削除しておきます。
7-3. ブラウザでの接続確認 www.testdom2.com
利用しているブラウザにURLを入力します。以前は保護されていないと表示された部分が「保護された通信」に変わっています。この状態は正常にHTTPS通信が出来ている場合に表示されます。
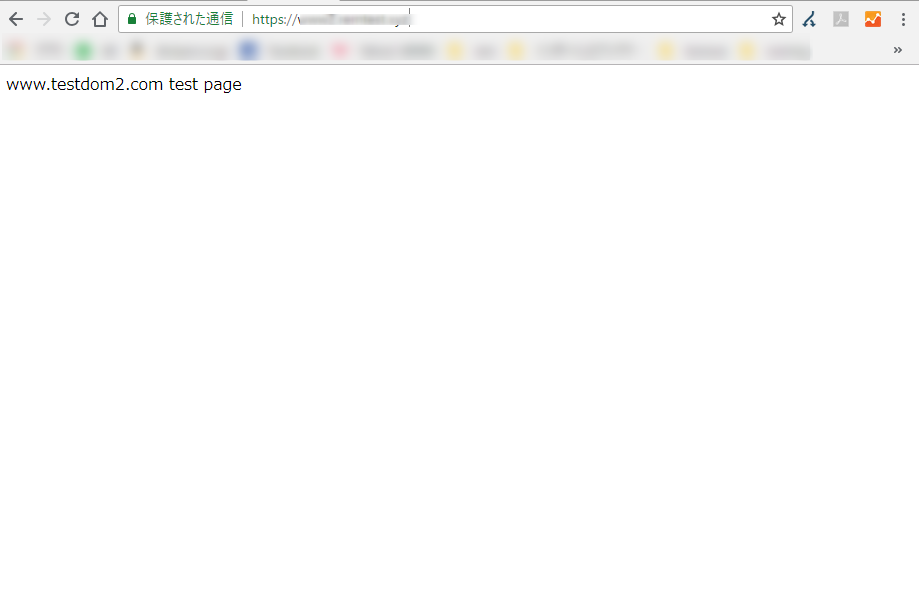
7-4. サーバー証明書の確認 www.testdom2.com
Google Chromeのデベロッパーツール(その他のツール=>デベロッパーツール)を起動して通信に問題がないことを確認します。以下のように表示されていれば、通信はセキュアに行われています。
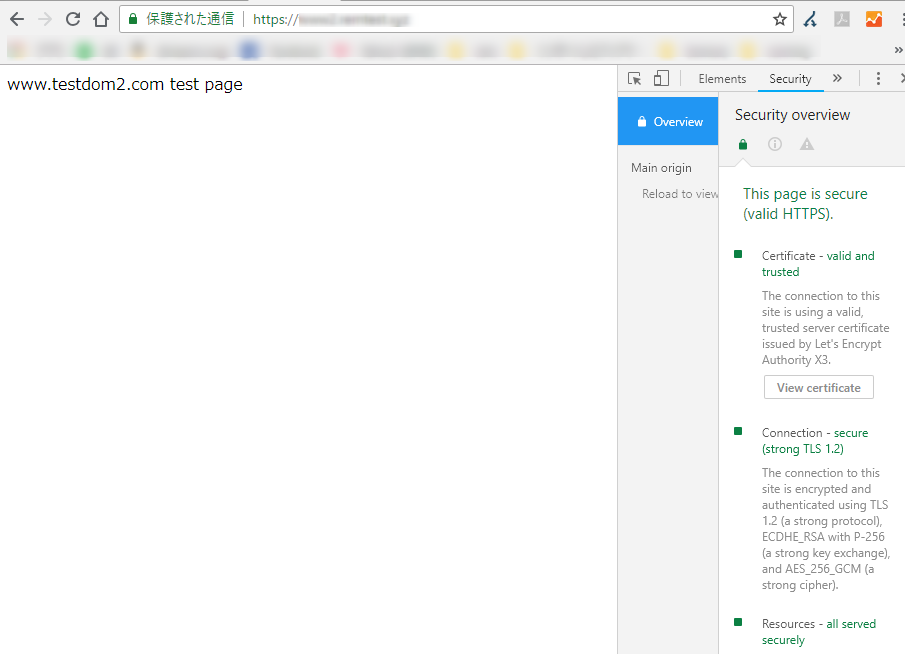
また[View certificate]をクリックすると、サーバー証明書が確認できます。
これでHTTPS通信が正常に行われていることが確認できました。作成したテスト用のindex.htmlファイルは削除しておきます。
8. サーバー証明書の更新
「項目7. 7. HTTPSの動作確認」まででサーバー証明書の組み込みと動作確認までが完了しました。このままの状態で基本的な設定は完了していますが、サーバー証明書は有効期間というものがあります。
通常、サーバー証明書は1~3年ぐらいの有効期限で取得しますが、Let's Encryptの場合、これが90日間と決まっています。90日が経過すると、有効期限が切れてしまい、サーバー証明書が無効である警告がブラウザに表示されてしまいます。これではHTTPSを設定した意味がなくなるため、有効期限を定期的に更新する設定を本章では紹介していきます。
8-1. 証明書の更新確認時のエラー
※本章で紹介しているdry-runによる証明書更新のテストですが、2018年6月現在でepelに含まれるcertbot(バージョン0.24)だとエラーで失敗するようです。
追記:2018年7月現在のcertbotパッケージ、バージョン0.25.1-1.el7では不具合が解決しています。0.25をご利用の場合は、この項目については飛ばして下さい。
表示されるエラー内容
All renewal attempts failed. The following certs could not be renewed:
/etc/letsencrypt/live/www.testdom.com/fullchain.pem (failure)
0.23と0.25では正常に確認が完了することから、恐らく0.24にあるバグだと考えられますが、この問題はtestバージョンのcertbot 0.25を利用することで回避できます。正式な0.25のリリースを待つほうが良いのですが、testingのバージョンをインストールすることも出来ます。
以下のように実行します。
# yum --enablerepo=epel-testing update --advisory FEDORA-EPEL-2018-c5e70f5b4f
実行結果は以下の通りです。
Loading mirror speeds from cached hostfile
epel-testing/x86_64/metalink | 8.7 kB 00:00:00
* base: ftp.tsukuba.wide.ad.jp
* epel: mirror.dmmlabs.jp
* epel-testing: mirror.dmmlabs.jp
* extras: ftp.tsukuba.wide.ad.jp
* remi-safe: ftp.riken.jp
* updates: ftp.tsukuba.wide.ad.jp
epel-testing | 3.2 kB 00:00:00
(1/3): epel-testing/x86_64/group_gz | 88 kB 00:00:00
(2/3): epel-testing/x86_64/updateinfo | 58 kB 00:00:00
(3/3): epel-testing/x86_64/primary | 208 kB 00:00:00
epel-testing 699/699
Update notice FEDORA-EPEL-2018-87ef985548 (epel-testing から) is broken, or a bad duplicate, skippi ng.
You should report this problem to the owner of the epel-testing repository.
If you are the owner, consider re-running the same command with --verbose to see the exact data tha t caused the conflict.
Update notice FEDORA-EPEL-2018-63207afaa1 (epel-testing から) is broken, or a bad duplicate, skippi ng.
Update notice FEDORA-EPEL-2018-1d8a6a5883 (epel-testing から) is broken, or a bad duplicate, skippi ng.
Update notice FEDORA-EPEL-2018-f5640a1613 (epel-testing から) is broken, or a bad duplicate, skippi ng.
Update notice FEDORA-EPEL-2018-e463154f41 (epel-testing から) is broken, or a bad duplicate, skippi ng.
Update notice FEDORA-EPEL-2018-42511843bc (epel-testing から) is broken, or a bad duplicate, skippi ng.
--> perl-Git-1.8.3.1-13.el7.noarch from @base removed (updateinfo)
--> MariaDB-server-10.2.16-1.el7.centos.x86_64 from mariadb removed (updateinfo)
--> python-perf-3.10.0-862.3.2.el7.x86_64 from @updates removed (updateinfo)
--> kernel-tools-3.10.0-862.3.2.el7.x86_64 from @updates removed (updateinfo)
--> git-1.8.3.1-14.el7_5.x86_64 from updates removed (updateinfo)
--> MariaDB-compat-10.2.15-1.el7.centos.x86_64 from @mariadb removed (updateinfo)
--> python-perf-3.10.0-862.3.3.el7.x86_64 from updates removed (updateinfo)
--> kernel-devel-3.10.0-862.3.3.el7.x86_64 from updates removed (updateinfo)
--> kernel-headers-3.10.0-862.3.3.el7.x86_64 from updates removed (updateinfo)
--> kernel-tools-libs-3.10.0-862.3.3.el7.x86_64 from updates removed (updateinfo)
--> perl-Git-1.8.3.1-14.el7_5.noarch from updates removed (updateinfo)
--> MariaDB-client-10.2.15-1.el7.centos.x86_64 from @mariadb removed (updateinfo)
--> kernel-3.10.0-862.3.3.el7.x86_64 from updates removed (updateinfo)
--> MariaDB-common-10.2.16-1.el7.centos.x86_64 from mariadb removed (updateinfo)
--> kernel-tools-libs-3.10.0-862.3.2.el7.x86_64 from @updates removed (updateinfo)
--> MariaDB-common-10.2.15-1.el7.centos.x86_64 from @mariadb removed (updateinfo)
--> MariaDB-client-10.2.16-1.el7.centos.x86_64 from mariadb removed (updateinfo)
--> MariaDB-devel-10.2.16-1.el7.centos.x86_64 from mariadb removed (updateinfo)
--> kernel-tools-3.10.0-862.3.3.el7.x86_64 from updates removed (updateinfo)
--> git-1.8.3.1-13.el7.x86_64 from @base removed (updateinfo)
--> MariaDB-server-10.2.15-1.el7.centos.x86_64 from @mariadb removed (updateinfo)
--> MariaDB-compat-10.2.16-1.el7.centos.x86_64 from mariadb removed (updateinfo)
--> MariaDB-devel-10.2.15-1.el7.centos.x86_64 from @mariadb removed (updateinfo)
--> kernel-headers-3.10.0-862.3.2.el7.x86_64 from @updates removed (updateinfo)
4 package(s) needed (+0 related) for security, out of 17 available
依存性の解決をしています
--> トランザクションの確認を実行しています。
---> パッケージ certbot.noarch 0:0.24.0-1.el7 を 更新
---> パッケージ certbot.noarch 0:0.25.1-1.el7 を アップデート
---> パッケージ python2-acme.noarch 0:0.24.0-1.el7 を 更新
---> パッケージ python2-acme.noarch 0:0.25.1-1.el7 を アップデート
--> 依存性の処理をしています: python-requests-toolbelt のパッケージ: python2-acme-0.25.1-1.el7.noar ch
---> パッケージ python2-certbot.noarch 0:0.24.0-1.el7 を 更新
---> パッケージ python2-certbot.noarch 0:0.25.1-1.el7 を アップデート
---> パッケージ python2-certbot-nginx.noarch 0:0.24.0-1.el7 を 更新
---> パッケージ python2-certbot-nginx.noarch 0:0.25.1-1.el7 を アップデート
--> トランザクションの確認を実行しています。
---> パッケージ python-requests-toolbelt.noarch 0:0.8.0-1.el7 を インストール
--> 依存性解決を終了しました。
依存性を解決しました
更新します:
certbot noarch 0.25.1-1.el7 epel-testing 21 k
python2-acme noarch 0.25.1-1.el7 epel-testing 139 k
python2-certbot noarch 0.25.1-1.el7 epel-testing 503 k
python2-certbot-nginx noarch 0.25.1-1.el7 epel-testing 66 k
依存性関連でのインストールをします:
python-requests-toolbelt noarch 0.8.0-1.el7 epel 77 k
トランザクションの要約
インストール ( 1 個の依存関係のパッケージ)
更新 4 パッケージ
総ダウンロード容量: 807 k
Is this ok [y/d/N]: y
Downloading packages:
Delta RPMs disabled because /usr/bin/applydeltarpm not installed.
(1/5): certbot-0.25.1-1.el7.noarch.rpm | 21 kB 00:00:00
(2/5): python-requests-toolbelt-0.8.0-1.el7.noarch.rpm | 77 kB 00:00:00
(3/5): python2-acme-0.25.1-1.el7.noarch.rpm | 139 kB 00:00:00
(4/5): python2-certbot-0.25.1-1.el7.noarch.rpm | 503 kB 00:00:00
(5/5): python2-certbot-nginx-0.25.1-1.el7.noarch.rpm | 66 kB 00:00:00
合計 738 kB/s | 807 kB 00:00:01
Running transaction check
Running transaction test
Transaction test succeeded
Running transaction
インストール中 : python-requests-toolbelt-0.8.0-1.el7.noarch 1/9
更新します : python2-acme-0.25.1-1.el7.noarch 2/9
更新します : python2-certbot-0.25.1-1.el7.noarch 3/9
更新します : certbot-0.25.1-1.el7.noarch 4/9
更新します : python2-certbot-nginx-0.25.1-1.el7.noarch 5/9
整理中 : python2-certbot-nginx-0.24.0-1.el7.noarch 6/9
整理中 : certbot-0.24.0-1.el7.noarch 7/9
整理中 : python2-certbot-0.24.0-1.el7.noarch 8/9
整理中 : python2-acme-0.24.0-1.el7.noarch 9/9
検証中 : python-requests-toolbelt-0.8.0-1.el7.noarch 1/9
検証中 : python2-certbot-0.25.1-1.el7.noarch 2/9
検証中 : python2-acme-0.25.1-1.el7.noarch 3/9
検証中 : certbot-0.25.1-1.el7.noarch 4/9
検証中 : python2-certbot-nginx-0.25.1-1.el7.noarch 5/9
検証中 : python2-certbot-0.24.0-1.el7.noarch 6/9
検証中 : python2-acme-0.24.0-1.el7.noarch 7/9
検証中 : python2-certbot-nginx-0.24.0-1.el7.noarch 8/9
検証中 : certbot-0.24.0-1.el7.noarch 9/9
依存性関連をインストールしました:
python-requests-toolbelt.noarch 0:0.8.0-1.el7
更新:
certbot.noarch 0:0.25.1-1.el7 python2-acme.noarch 0:0.25.1-1.el7
python2-certbot.noarch 0:0.25.1-1.el7 python2-certbot-nginx.noarch 0:0.25.1-1.el7
完了しました!
実行後にcertbotのバージョンを確認してみます。
$ yum list installed | grep certbot
certbot.noarch 0.25.1-1.el7 @epel-testing
python2-certbot.noarch 0.25.1-1.el7 @epel-testing
python2-certbot-nginx.noarch 0.25.1-1.el7 @epel-testing
上記のようにバージョンが0.25に変更されています。このバージョンでは更新テストによるエラーは出力されません。因みにバージョン0.23では問題なくテストの実行が可能です。これから先の内容はdry-run(更新テスト)が実行できる環境であるという前提で進めて行きます。
8-2. 証明書の更新確認
Let's Encryptでは証明書の更新手順が用意されています。具体的にはcertbotコマンドに”renew”オプションを付けて実行します。更新設定を行う前に更新が実行できるかをテストします。
テストは”--dry-run”オプションを付けることで行うことができます。
具体的には以下のように実行します。
# certbot renew --dry-run
以下が実行結果になります。
-------------------------------------------------------------------------------
Processing /etc/letsencrypt/renewal/www.testdom.com.conf
-------------------------------------------------------------------------------
Cert not due for renewal, but simulating renewal for dry run
Plugins selected: Authenticator webroot, Installer None
Starting new HTTPS connection (1): acme-staging-v02.api.letsencrypt.org
Renewing an existing certificate
Performing the following challenges:
http-01 challenge for testdom.com
http-01 challenge for www.testdom.com
Waiting for verification...
Cleaning up challenges
-------------------------------------------------------------------------------
new certificate deployed without reload, fullchain is
/etc/letsencrypt/live/www.testdom.com/fullchain.pem
-------------------------------------------------------------------------------
-------------------------------------------------------------------------------
Processing /etc/letsencrypt/renewal/www.testdom2.com.conf
-------------------------------------------------------------------------------
Cert not due for renewal, but simulating renewal for dry run
Plugins selected: Authenticator webroot, Installer None
Starting new HTTPS connection (1): acme-staging-v02.api.letsencrypt.org
Renewing an existing certificate
Performing the following challenges:
http-01 challenge for testdom2.com
http-01 challenge for www.testdom2.com
Waiting for verification...
Cleaning up challenges
-------------------------------------------------------------------------------
new certificate deployed without reload, fullchain is
/etc/letsencrypt/live/http-01 challenge for www.testdom2.com/fullchain.pem
-------------------------------------------------------------------------------
-------------------------------------------------------------------------------
** DRY RUN: simulating 'certbot renew' close to cert expiry
** (The test certificates below have not been saved.)
Congratulations, all renewals succeeded. The following certs have been renewed:
/etc/letsencrypt/live/http-01 challenge for www.testdom.com/fullchain.pem (success)
/etc/letsencrypt/live/http-01 challenge for www.testdom2.com/fullchain.pem (success)
** DRY RUN: simulating 'certbot renew' close to cert expiry
** (The test certificates above have not been saved.)
-------------------------------------------------------------------------------
実行結果にふくまれる”Congratulations, all renewals succeeded.”から正常に更新ができることを確認できました。これで確認は完了です。
8-3. 更新コマンドの定期実行設定
更新コマンドの実行が確認できましたので、定期的に実行するようにcronに設定を行います。cronの設定にはcrontabにコマンドを利用します。crontabはrootユーザーで実行します。設定はcrontabコマンドを以下のように実行します。
# crontab -e
実行するとエディタが起動します。以下を追記します。”--deploy-hook”オプションは、サーバー証明書の更新が行われた場合のみ実行するコマンドを指定できます。更新時にはnginxを再起動して、更新された証明書を読み込む必要があるため、nginx再起動用のコマンドを指定します。
本記事では以下のように設定を行います。
00 3 * * * certbot renew -q --deploy-hook "systemctl restart nginx"
00 5 * * * certbot renew -q --deploy-hook "systemctl restart nginx"
上記は毎日3:500と5:00に更新コマンドを実行する場合の記載です。(2回実行するように記載しているのは、1回目が失敗した場合のため)もし他の時刻にしたい場合には、3と5を適宜変更します。変更後にはファイルを保存します。(viコマンドと同じ保存手順)
設定後にcrontabの内容を確認します。確認は
# crontab -l
と実行します。先ほど追加した設定が表示されれば、自動更新の設定は完了です。
9. まとめ
Apacheに引き続き、nginxでもHTTPS通信を行う場合の手順を紹介しました。バーチャルホスト事に設定することができますので、サイトが多い環境ではメリットが出やすい設定です。Apacheと比較すると、設定内容が煩雑ですが、一度覚えると比較的簡単に設定できるようになると思います。是非、設定してHTTPS通信のメリットを感じて下さい。