

nginxに関する前回の記事
-

-
CentOSのNginxにFastCGIキャッシュを設定してサイト速度を100倍にする
こんにちは、ITエンジニアの小村(@system_kom)です。 前回の記事でnginxの環境にPHPアクセラレーターと呼ばれるPHPにキャッシュ機能を追加するパッケージ「OPcache」と「APCu」の導入までを紹介しました。 今回はさら ...
でnginxの環境でFastCGIキャッシュと呼ばれるウェブサイトの処理速度を向上させるためのキャッシュ機能の設定までを紹介しました。今回はその環境にHTTPの拡張プロトコルであるHTTP/2の設定を行ってみます。
HTTP/2はHTTPの通信を効率よく行うことができるように、従来のHTTP/1.1をバージョンアップしたHTTPの通信規格にです。HTTP/1.1の場合1つのリクエストが終了するまで、次のリクエストを送ることができません。これが大きな通信速度遅延の要因のひとつでした。HTTP/2通信規格では、複数の要求を1つの接続で行うことができるため、サイトの速度向上に期待が出来ます。
多少、分かり難い説明だと思います。実際の動きについては、以下のサイトで視覚的に確認が出来ます。
またHTTP/2プロトコルについて、更に詳しく知りたい方には以下のサイトがオススメです。
HTTP/2 Frequently Asked Questions
HTTP/2 の概要
本記事と合わせて参考にしてみて下さい。
尚、HTTP/2については、現在、HTTPS通信でしか利用することができません。その為、本記事の設定を行う場合には、事前にサイトのSSL化が必要となる点にご注意下さい。nginxでサイトをSSL化するための手順は、記事
-

-
CentOS 7のNginxにLet's Encryptを導入してサイトをHTTPS化する方法
前回の記事でnginxの設定とphpの導入までが完了しました。 本記事では、ウェブサーバー(nginx)のHTTP通信を暗号化してセキュアな通信を行うための機能であるHTTPS通信をnginxで利用するまでの手順を紹介します。 HTTPSは ...
で詳しく紹介しています。SSL化を行っていない場合は参考にして下さい。それではHTTP/2を利用するための具体的な手順を紹介していきます。
1. HTTP/2を設定する環境
HTTP/2を設定する環境はnginx環境へFastCGIキャッシュの設定手順を紹介した記事
-
-
CentOSのNginxにFastCGIキャッシュを設定してサイト速度を100倍にする
こんにちは、ITエンジニアの小村(@system_kom)です。 前回の記事でnginxの環境にPHPアクセラレーターと呼ばれるPHPにキャッシュ機能を追加するパッケージ「OPcache」と「APCu」の導入までを紹介しました。 今回はさら ...
でも紹介していますが、確認の意味で再度纏めておきます。基本的な環境は以下の通りです。
- OSのバージョンはCentOSで最新のバージョン7.5を利用しています。(2016年7月現在)
- ウェブサーバーとしてnginx1.15.0がインストールされています。(2018年7月現在、mainline最新版)
- nginxは基本的な設定が完了して、バーチャルホストが二つ設定されています。
- バーチャルホストは”www.testdom.com”と”www.testdom2.com”になります。
- phpとphp-fpmの7.2系がインストールされて、テスト用のwordpressサイトが表示されています。
- phpアクセラレータとしてOPcacheとAPCuがインストールされています。
- Let's Encrypytを利用してHTTPS通信の機能を有効化しています。
- サーバーはインターネットへ接続されており、グローバルIPアドレスが一つ、割り当てられています。
- ファイアウォールとしてfirewalldを設定しています。
- nginxのキャッシュ機能としてFastCGIキャッシュを設定しています。
この環境を前提にHTTP/2の設定を進めていきます。
2. バーチャルホストへのHTTP/2設定
本環境ではnginxでバーチャルホストを設定しています。その為、設定手順としてはバーチャルホストで利用するという前提で手順を紹介します。まずHTTP/2をバーチャルホストで利用するために設定が必要なファイルは”/etc/nginx/sites-available"ディレクトリに含まれるバーチャルホスト用の設定ファイル”ドメイン名”.confになります。以下が現状のディレクトリとファイルの構成です。
/etc/nginx/
|-- conf.d
|-- fastcgi_params
|-- koi-utf
|-- koi-win
|-- mime.types
|-- modules -> ../../usr/lib64/nginx/modules
|-- nginx.conf
|-- scgi_params
|-- sites-available
| |-- default.conf
| |-- www.testdom.com.conf
| |-- www.testdom2.com.conf
|-- sites-enabled
| |-- default.conf -> /etc/nginx/sites-available/default.conf
| |-- www.testdom.com.conf -> /etc/nginx/sites-available/www.testdom.com.conf
| `-- www.testdom2.com.conf -> /etc/nginx/sites-available/www.testdom2.com.conf
|-- ssl
| `-- dhparam.pem
|-- uwsgi_params
`-- win-utf
上記ディレクトリツリー上の”sites-available”ディレクトリに含まれる設定ファイル
- www.testdom.com.conf
- www.testdom2.com.conf
が今回の設定対象です。
2-1. www.testdom.com.conf設定ファイルのバックアップ
HTTP/2通信に関する設定はバーチャルホスト用設定ファイルであるwww.testdom.com.confに行います。先ずはこのファイルをバックアップします。以下の手順でバックアップを行います。
# cp -p /etc/nginx/sites-available/www.testdom.com.conf /etc/nginx/sites-available/www.testdom.com.conf.org4
コピーされたバックアップファイルが存在することを確認します。
$ ls /etc/nginx/sites-available/
default.conf www.testdom.com.conf www.testdom.com.conf.org www.testdom.com.conf.org2 www.testdom.com.conf.org3 www.testdom.com.conf.org4 www.testdom2.com.conf
コピーしたファイル”www.testdom.com.conf.org4”があることが確認できました。
2-2. www.testdom.com.conf 設定ファイルの編集
ファイルのバックアップが完了しましたので”www.testdom.com.conf”を編集していきます。FastCGIキャッシュの設定までが完了している、変更前の設定ファイルの内容は以下のようになります。
server {
listen 80;
server_name testdom.com www.testdom.com;
rewrite ^ https://$server_name$request_uri? permanent;
}
server {
listen 443 ssl;
server_name testdom.com www.testdom.com;
access_log /var/log/nginx/www.testdom.com-access.log main;
error_log /var/log/nginx/www.testdom.com-error.log;
root /home/www/www.testdom.com;
ssl_certificate /etc/letsencrypt/live/www.testdom.com/fullchain.pem;
ssl_certificate_key /etc/letsencrypt/live/www.testdom.com/privkey.pem;
ssl_session_timeout 1d;
ssl_session_cache shared:SSL:50m;
ssl_session_tickets on;
ssl_dhparam /etc/nginx/ssl/dhparam.pem;
ssl_protocols TLSv1 TLSv1.1 TLSv1.2;
ssl_ciphers HIGH:!aNULL:!MD5;
ssl_prefer_server_ciphers on;
location / {
index index.html index.htm index.php;
try_files $uri $uri/ /index.php?$args;
}
location ~ \.php$ {
fastcgi_pass 127.0.0.1:9000;
fastcgi_index index.php;
fastcgi_param SCRIPT_FILENAME $document_root$fastcgi_script_name;
include fastcgi_params;
set $do_not_cache 0;
if ($request_method = POST) {
set $do_not_cache 1;
}
if ($query_string != "") {
set $do_not_cache 1;
}
if ($http_cookie ~* "comment_author|wordpress_[a-f0-9]+|wp-postpass|wordpress_no_cache|wordpress_logged_in") {
set $do_not_cache 1;
}
if ($request_uri ~* "(/wp-admin/|/xmlrpc.php|/wp-(app|cron|login|register|mail).php|wp-.*.php|/feed/|index.php|wp-comments-popup.php|wp-links-opml.php|wp-locations.php|sitemap(_index)?.xml|[a-z0-9_-]+-sitemap([0-9]+)?.xml)") {
set $do_not_cache 1;
}
fastcgi_cache testdom;
fastcgi_cache_valid 200 60m;
fastcgi_no_cache $do_not_cache;
fastcgi_cache_bypass $do_not_cache;
add_header X-F-Cache $upstream_cache_status;
}
}
上記の記載内容で、変更が必要な部分は、serverディレクティブのlisten設定になります。現在の設定は
server {
listen 443 ssl;
server_name testdom.com www.testdom.com;
access_log /var/log/nginx/www.testdom.com-access.log main;
error_log /var/log/nginx/www.testdom.com-error.log;
root /home/www/www.testdom.com;
となっているlisten設定にhttp2を追加します。具体的には以下のように変更します。
server {
listen 443 ssl http2;
server_name testdom.com www.testdom.com;
access_log /var/log/nginx/www.testdom.com-access.log main;
error_log /var/log/nginx/www.testdom.com-error.log;
root /home/www/www.testdom.com;
2-3. HTTP/2設定変更後のバーチャルホスト用設定ファイル
HTTP/2を利用するように変更した設定ファイル全体は以下のようになります。
server {
listen 80;
server_name testdom.com www.testdom.com;
rewrite ^ https://$server_name$request_uri? permanent;
}
server {
listen 443 ssl http2;
server_name testdom.com www.testdom.com;
access_log /var/log/nginx/www.testdom.com-access.log main;
error_log /var/log/nginx/www.testdom.com-error.log;
root /home/www/www.testdom.com;
ssl_certificate /etc/letsencrypt/live/www.testdom.com/fullchain.pem;
ssl_certificate_key /etc/letsencrypt/live/www.testdom.com/privkey.pem;
ssl_session_timeout 1d;
ssl_session_cache shared:SSL:50m;
ssl_session_tickets on;
ssl_dhparam /etc/nginx/ssl/dhparam.pem;
ssl_protocols TLSv1 TLSv1.1 TLSv1.2;
ssl_ciphers HIGH:!aNULL:!MD5;
ssl_prefer_server_ciphers on;
location / {
index index.html index.htm index.php;
try_files $uri $uri/ /index.php?$args;
}
location ~ \.php$ {
fastcgi_pass 127.0.0.1:9000;
fastcgi_index index.php;
fastcgi_param SCRIPT_FILENAME $document_root$fastcgi_script_name;
include fastcgi_params;
set $do_not_cache 0;
if ($request_method = POST) {
set $do_not_cache 1;
}
if ($query_string != "") {
set $do_not_cache 1;
}
if ($http_cookie ~* "comment_author|wordpress_[a-f0-9]+|wp-postpass|wordpress_no_cache|wordpress_logged_in") {
set $do_not_cache 1;
}
if ($request_uri ~* "(/wp-admin/|/xmlrpc.php|/wp-(app|cron|login|register|mail).php|wp-.*.php|/feed/|index.php|wp-comments-popup.php|wp-links-opml.php|wp-locations.php|sitemap(_index)?.xml|[a-z0-9_-]+-sitemap([0-9]+)?.xml)") {
set $do_not_cache 1;
}
fastcgi_cache testdom;
fastcgi_cache_valid 200 60m;
fastcgi_no_cache $do_not_cache;
fastcgi_cache_bypass $do_not_cache;
add_header X-F-Cache $upstream_cache_status;
}
}
これで設定ファイルの変更は完了です。変更したファイルを保存します。
2-4. www.testdom2.com.conf設定ファイルのバックアップ
同様の設定を、もう一つのバーチャルホスト用設定ファイルであるwww.testdom2.com.confに行います。先ずはこのファイルをバックアップします。
以下の手順でコピーを行います。
# cp -p /etc/nginx/sites-available/www.testdom2.com.conf /etc/nginx/sites-available/www.testdom2.com.conf.org4
コピーされたバックアップファイルが存在することを確認します。
$ ls /etc/nginx/sites-available/
default.conf www.testdom.com.conf www.testdom.com.conf.org www.testdom.com.conf.org2 www.testdom.com.conf.org3 www.testdom.com.conf.org4 www.testdom2.com.conf
コピーしたファイル”www.testdom2.com.conf.org4”があることが確認できました。
2-5. www.testdom2.com.conf 設定ファイルの編集
ファイルのバックアップが完了しましたので”www.testdom2.com.conf”を編集していきます。FastCGIキャッシュの設定までが完了している、変更前の設定ファイルの内容は以下のようになります。
server {
listen 80;
server_name testdom2.com www.testdom2.com;
rewrite ^ https://$server_name$request_uri? permanent;
}
server {
listen 443 ssl;
server_name testdom.com www.testdom2.com;
access_log /var/log/nginx/www.testdom2.com-access.log main;
error_log /var/log/nginx/www.testdom2.com-error.log;
root /home/www/www.testdom2.com;
ssl_certificate /etc/letsencrypt/live/www.testdom2.com/fullchain.pem;
ssl_certificate_key /etc/letsencrypt/live/www.testdom2.com/privkey.pem;
ssl_session_timeout 1d;
ssl_session_cache shared:SSL:50m;
ssl_session_tickets on;
ssl_dhparam /etc/nginx/ssl/dhparam.pem;
ssl_protocols TLSv1 TLSv1.1 TLSv1.2;
ssl_ciphers HIGH:!aNULL:!MD5;
ssl_prefer_server_ciphers on;
location / {
index index.html index.htm index.php;
try_files $uri $uri/ /index.php?$args;
}
location ~ \.php$ {
fastcgi_pass 127.0.0.1:9000;
fastcgi_index index.php;
fastcgi_param SCRIPT_FILENAME $document_root$fastcgi_script_name;
include fastcgi_params;
set $do_not_cache 0;
if ($request_method = POST) {
set $do_not_cache 1;
}
if ($query_string != "") {
set $do_not_cache 1;
}
if ($http_cookie ~* "comment_author|wordpress_[a-f0-9]+|wp-postpass|wordpress_no_cache|wordpress_logged_in") {
set $do_not_cache 1;
}
if ($request_uri ~* "(/wp-admin/|/xmlrpc.php|/wp-(app|cron|login|register|mail).php|wp-.*.php|/feed/|index.php|wp-comments-popup.php|wp-links-opml.php|wp-locations.php|sitemap(_index)?.xml|[a-z0-9_-]+-sitemap([0-9]+)?.xml)") {
set $do_not_cache 1;
}
fastcgi_cache testdom2;
fastcgi_cache_valid 200 60m;
fastcgi_no_cache $do_not_cache;
fastcgi_cache_bypass $do_not_cache;
add_header X-F-Cache $upstream_cache_status;
}
}
上記の記載内容で、変更が必要な部分は、serverディレクティブのlisten設定になります。現在の設定は
server {
listen 443 ssl;
server_name testdom2.com www.testdom2.com;
access_log /var/log/nginx/www.testdom2.com-access.log main;
error_log /var/log/nginx/www.testdom2.com-error.log;
root /home/www/www.testdom2.com;
となっているlisten設定にをhttp2を追加します。具体的には以下のように変更します。
server {
listen 443 ssl http2;
server_name testdom2.com www.testdom2.com;
access_log /var/log/nginx/www.testdom2.com-access.log main;
error_log /var/log/nginx/www.testdom2.com-error.log;
root /home/www/www.testdom2.com;
2-6. 変更後のバーチャルホスト用設定ファイル
変更後の設定ファイル全体は以下のようになります。
server {
listen 80;
server_name testdom2.com www.testdom2.com;
rewrite ^ https://$server_name$request_uri? permanent;
}
server {
listen 443 ssl http2;
server_name testdom2.com www.testdom2.com;
access_log /var/log/nginx/www.testdom2.com-access.log main;
error_log /var/log/nginx/www.testdom2.com-error.log;
root /home/www/www.testdom2.com;
ssl_certificate /etc/letsencrypt/live/www.testdom2.com/fullchain.pem;
ssl_certificate_key /etc/letsencrypt/live/www.testdom2.com/privkey.pem;
ssl_session_timeout 1d;
ssl_session_cache shared:SSL:50m;
ssl_session_tickets on;
ssl_dhparam /etc/nginx/ssl/dhparam.pem;
ssl_protocols TLSv1 TLSv1.1 TLSv1.2;
ssl_ciphers HIGH:!aNULL:!MD5;
ssl_prefer_server_ciphers on;
location / {
index index.html index.htm index.php;
try_files $uri $uri/ /index.php?$args;
}
location ~ \.php$ {
fastcgi_pass 127.0.0.1:9000;
fastcgi_index index.php;
fastcgi_param SCRIPT_FILENAME $document_root$fastcgi_script_name;
include fastcgi_params;
set $do_not_cache 0;
if ($request_method = POST) {
set $do_not_cache 1;
}
if ($query_string != "") {
set $do_not_cache 1;
}
if ($http_cookie ~* "comment_author|wordpress_[a-f0-9]+|wp-postpass|wordpress_no_cache|wordpress_logged_in") {
set $do_not_cache 1;
}
if ($request_uri ~* "(/wp-admin/|/xmlrpc.php|/wp-(app|cron|login|register|mail).php|wp-.*.php|/feed/|index.php|wp-comments-popup.php|wp-links-opml.php|wp-locations.php|sitemap(_index)?.xml|[a-z0-9_-]+-sitemap([0-9]+)?.xml)") {
set $do_not_cache 1;
}
fastcgi_cache testdom2;
fastcgi_cache_valid 200 60m;
fastcgi_no_cache $do_not_cache;
fastcgi_cache_bypass $do_not_cache;
add_header X-F-Cache $upstream_cache_status;
}
}
これで設定ファイルの変更は完了です。変更したファイルを保存します。
2-7. 設定ファイルの確認
設定ファイルの作成と配置が完了したら、間違いや問題がないかを確認します。nginxに”-t”オプションを付けて実行することで設定ファイルの間違いをチェックできます。設定変更後には実行することをお勧めします。
以下のように実行します。
# nginx -t
nginx: the configuration file /etc/nginx/nginx.conf syntax is ok
nginx: configuration file /etc/nginx/nginx.conf test is successful
上記のように、”test is successful”と表示されていればファイルには問題ありません。
3. 設定の有効化
設定ファイルの変更を行った場合には、ファイル再読み込みとして、nginxの再起動が必要になります。systemctlコマンドでnginxを再起動します。
# systemctl restart nginx
エラーが出力されなければ、正常に再起動は完了しています。これでHTTP/2設定の有効化は完了です。
4. HTTP/2プロトコルの動作確認
「項目3. 設定の有効化」まででHTTP/2の設定が完了しました。ここからは実際にブラウザでサイトへ接続して、正常にHTTP/2通信が動作していることを確認していきます。利用しているブラウザはGoogle Chromeになります。
4-1. HTTP/2通信の確認 www.testdom.com
Google Chromeのデベロッパーツール(その他のツール=>デベロッパーツール)を起動します。[Network]を選択して、ページをリロードします。
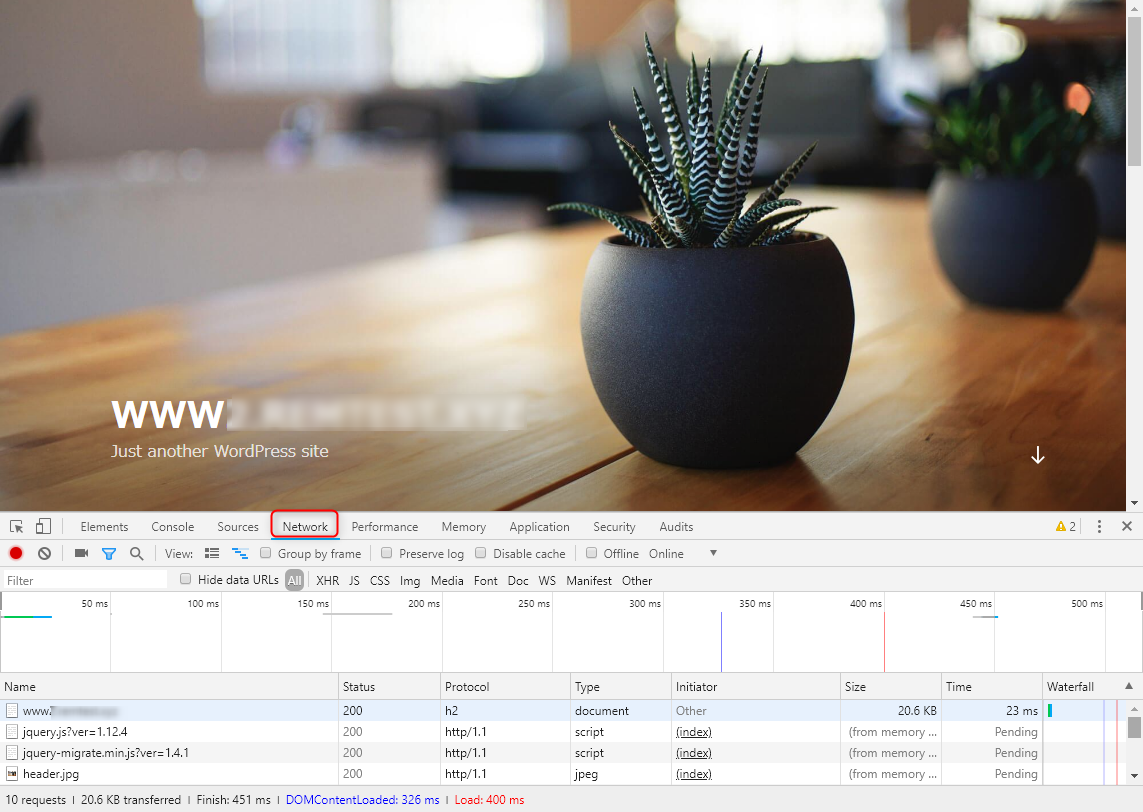
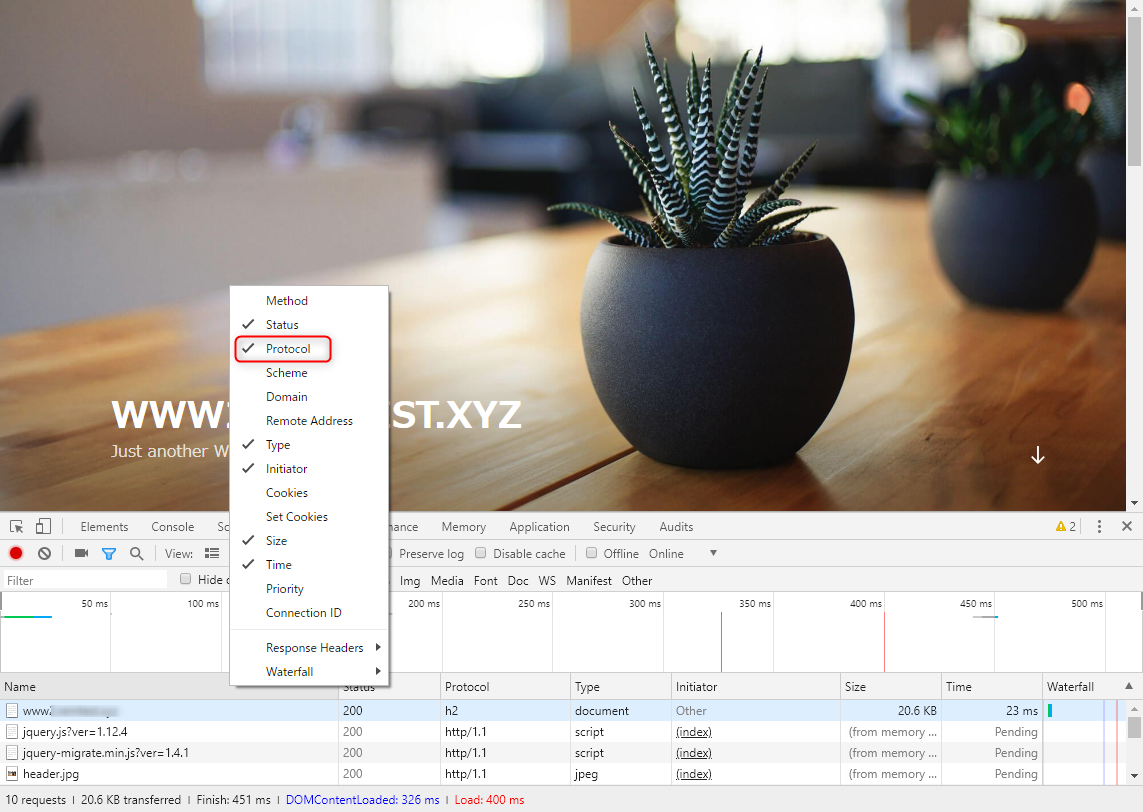
表示される[Name]などのカラムを右クリックすると、表示項目の追加メニューが表示されます。
[Protocol]にチェックを入れます。
再度ページをリロードすると、接続プロトコルが表示されます。本環境では以下のように”h2”と表示されることから、HTTP/2通信が行われていることが確認できました。

4-2. HTTP/2通信の確認 www.testdom2.com
続いて”www.testdom2.com”でもHTTP/2通信を確認します。確認方法は項目4-1. で記載した手順と同じで、ページを取得した際の通信プロトコルをデベロッパーツールから確認します。
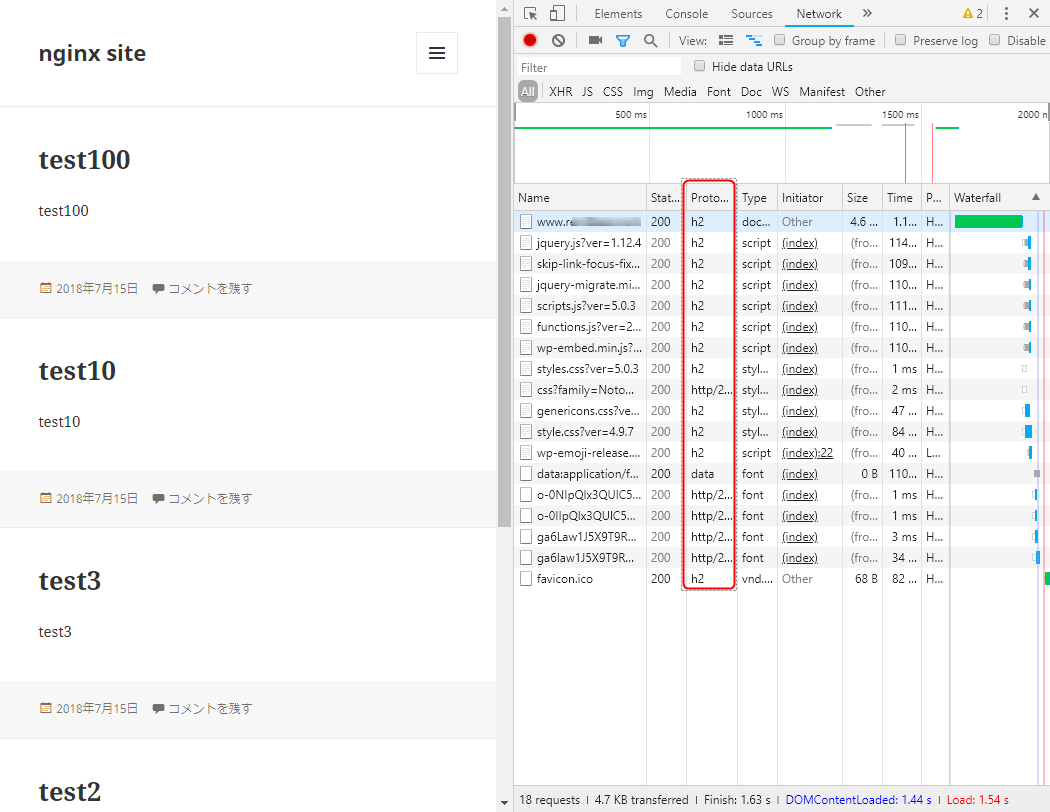
上記のようにProtocolが”h2”になっていれば、HTTP/2通信は有効になっています。これで確認は完了です。
5. パフォーマンスの比較
ここまででHTTP/2の設定と動作確認が完了しました。実際のどの程度、パフォーマンスが向上したかをApacheに付属しているApache Benchコマンド、”ab”で測定してみます。abはApacheを導入すると同時にインストールされます。ここでは環境として、別のサーバーから、HTTP/2を有効にしたnginxサーバーを測定するようにしています。
5-1. HTTP/2 設定前のテスト
先ずはHTTP/2が有効になっていないサイトに対してテストを行います。(FastCGIキャッシュは有効)abコマンドにはオプションとして”-n”と”-c”を指定します。-nはリクエスト総数を指定します。-cは同時接続数になります。本記事では、リクエスト数と同時接続数をやや増やして、300リクエストを同時接続20ユーザーを前提としてテストを実行しました。
結果は以下のようになりました。
HTTP/2 設定前のテスト
$ ab -n 300 -c 20 https://www.testdom.com/
This is ApacheBench, Version 2.3 <$Revision: 1430300 $>
Copyright 1996 Adam Twiss, Zeus Technology Ltd, http://www.zeustech.net/
Licensed to The Apache Software Foundation, http://www.apache.org/
Benchmarking www.testdom.com (be patient)
Completed 100 requests
Completed 200 requests
Completed 300 requests
Finished 300 requests
Server Software: nginx
Server Hostname: www.testdom.com
Server Port: 443
SSL/TLS Protocol: TLSv1.2,ECDHE-RSA-AES256-GCM-SHA384,2048,256
Document Path: /
Document Length: 55361 bytes
Concurrency Level: 20
Time taken for tests: 0.528 seconds
Complete requests: 300
Failed requests: 0
Write errors: 0
Total transferred: 16690200 bytes
HTML transferred: 16608300 bytes
Requests per second: 568.34 [#/sec] (mean)
Time per request: 35.190 [ms] (mean)
Time per request: 1.760 [ms] (mean, across all concurrent requests)
Transfer rate: 30878.02 [Kbytes/sec] received
Connection Times (ms)
min mean[+/-sd] median max
Connect: 5 29 4.1 29 47
Processing: 2 4 2.6 4 18
Waiting: 1 4 0.7 3 7
Total: 7 34 4.9 33 52
WARNING: The median and mean for the waiting time are not within a normal deviation
These results are probably not that reliable.
Percentage of the requests served within a certain time (ms)
50% 33
66% 33
75% 34
80% 35
90% 40
95% 44
98% 47
99% 48
100% 52 (longest request)
本テストでは以下の項目に注目しました。
- Time taken for tests: 0.528 seconds
- Requests per second: 568.34 [#/sec] (mean)
”Time taken~”はテストの所要時間、”Requests per~”は秒間でどれだけのリクエストを処理できたかを示す項目になります。上記から従来の構成では、テストの所要時間は約0.5秒で、1秒間に処理できたリクエストは約570になります。
5-2. HTTP/2設定後のテスト
続いて、同じ条件でHTTP/2設定後のnginxサーバーについてテストを行います。結果は以下のようになりました。
HTTP/2設定後のテスト
$ ab -n 300 -c 20 https://www.testdom.com/
This is ApacheBench, Version 2.3 <$Revision: 1430300 $>
Copyright 1996 Adam Twiss, Zeus Technology Ltd, http://www.zeustech.net/
Licensed to The Apache Software Foundation, http://www.apache.org/
Benchmarking www.testdom.com (be patient)
Completed 100 requests
Completed 200 requests
Completed 300 requests
Finished 300 requests
Server Software: nginx
Server Hostname: www.testdom.com
Server Port: 443
SSL/TLS Protocol: TLSv1.2,ECDHE-RSA-AES256-GCM-SHA384,2048,256
Document Path: /
Document Length: 55361 bytes
Concurrency Level: 20
Time taken for tests: 0.544 seconds
Complete requests: 300
Failed requests: 0
Write errors: 0
Total transferred: 16690200 bytes
HTML transferred: 16608300 bytes
Requests per second: 551.47 [#/sec] (mean)
Time per request: 36.267 [ms] (mean)
Time per request: 1.813 [ms] (mean, across all concurrent requests)
Transfer rate: 29961.16 [Kbytes/sec] received
Connection Times (ms)
min mean[+/-sd] median max
Connect: 4 31 4.2 31 41
Processing: 2 4 0.7 4 9
Waiting: 1 4 0.5 4 6
Total: 6 35 4.3 35 45
Percentage of the requests served within a certain time (ms)
50% 35
66% 35
75% 36
80% 36
90% 39
95% 40
98% 42
99% 44
100% 45 (longest request)
本テストでは以下の項目に注目しました。
- Time taken for tests: 0.544 seconds
- Requests per second: 551.47 [#/sec] (mean)
”Time taken~”はテストの所要時間、”Requests per~”は秒間でどれだけのリクエストを処理できたかを示す項目になります。上記から従来の構成では、テストの所要時間は約0.5秒で、1秒間に処理できたリクエストは約550になります。
本テスト環境ではHTTP/2通信が行われていますが、HTTP/1.1の場合と比較して、やや遅くなっていることが確認できました。
HTTP/2通信においては、一つのリクエストで複数の要求を対応できるようになっていますが、サイトの作りや、ファイル数に影響されるように見受けられます。その為、必ずしも速度が向上するという結果ではありませんでした。
6. まとめ
最近のnginxでは、比較的、簡単にHTTP/2通信を行うように設定することができます。HTTPSを含めてHTTP/2は今後のHTTPプロトコルの主流になっていくかと思います。
速度の向上という面では、それ程までには実感はできませんが、HTTP通信を効率よく処理できることは間違いありませんので、nginxをご利用の場合は、是非、設定を行ってみて下さい。